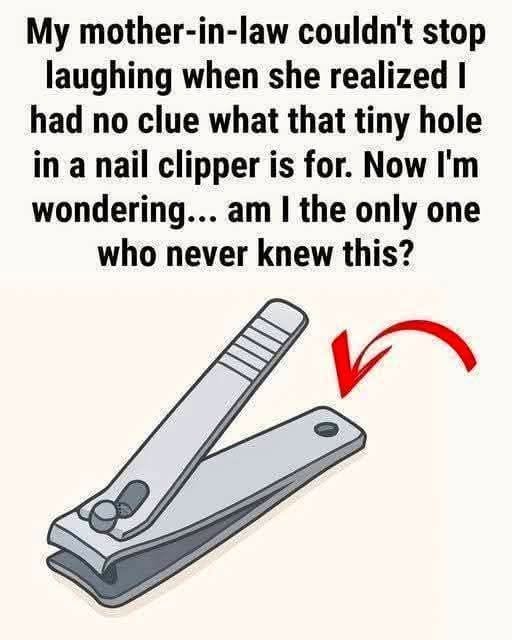
Bonus: What About the “Second Hole” on Some Clippers?
Some nail clippers have a second, smaller hole near the pivot pin. This is not the same as the hole we’re discussing.
What that hole is for: It’s usually part of the manufacturing process—a guide hole for drilling or assembly. It doesn’t have a functional purpose for the user.
If your clipper has a second hole: Ignore it. Focus on the larger hole at the far end.
Common Myths About the Hole (Debunked)
Let me clear up a few misconceptions I’ve seen online.
Myth #1: “It’s for catching nail clippings.”
No. Nail clippings fly everywhere. The hole is far too small to catch them. Use a piece of tape or clip over a trash can.
Myth #2: “It’s for sharpening the blades.”
No. You cannot sharpen nail clipper blades with the hole. (You can sharpen them by cutting through fine-grit sandpaper or aluminum foil—but that’s a different trick.)
Myth #3: “It’s for removing hangnails.”
No. The hole is too small and the edges are not sharp. Use cuticle nippers or small scissors.
Myth #4: “It’s for gripping the clipper with your finger.”
No. The hole is too small for most fingers. Some very small clippers (for babies or pets) have larger holes for this purpose, but standard adult clippers do not.
Myth #5: “It’s just a manufacturing leftover.”
Partially true. Some manufacturing processes leave a small hole from the stamping or casting process. But on most quality clippers, the hole is intentionally designed and finished.
How to Use the Hole to Extend Your Clipper’s Life
Let me give you practical, step-by-step instructions for the most useful application: fixing misaligned blades.
What You’ll Need:
-
Your misaligned nail clipper
-
Another nail clipper (or a small screwdriver, paperclip, or sturdy pin)
Steps:
-
Examine the blades. Which one is misaligned? (Look from the side. One blade should sit exactly on top of the other. If one is higher, that’s the misaligned one.)
-
Insert the tip of another clipper (or your tool) into the hole of the misaligned clipper.
-
Gently apply pressure in the opposite direction of the misalignment. For example, if the top blade is bent upward, push down.
-
Make small adjustments. Bend a little, then test. Repeat until the blades align.
-
Clean the clipper with rubbing alcohol after adjusting.
When to replace instead of fix: If the blade is bent severely, cracked, or if the pivot pin is loose, replace the clipper. A poorly repaired clipper can cut unevenly or injure you.
How to Clean Your Nail Clipper (Using the Hole)
The hole can help with cleaning, but here’s the full method.
What You’ll Need:
-
Rubbing alcohol (70% or higher)
-
Cotton swabs
-
Toothpick or paperclip
-
Small brush (an old toothbrush works)
Steps:
-
Soak a cotton swab in rubbing alcohol. Wipe down both blades, the lever, and the pivot pin.
-
Use a toothpick or paperclip to scrape debris from between the blades. Insert the paperclip into the hole to stabilize the clipper while you scrape.
-
Dip the small brush in alcohol and scrub the crevices.
-
Rinse with water (if the clipper is rust-resistant). Dry thoroughly.
-
Hang the clipper by the hole to air dry.
How often: After every use (quick wipe) and deep clean monthly.
A Brief History of the Nail Clipper (And That Hole)
The modern nail clipper was patented in 1875 by Valentine Fogerty, though similar tools existed before. The design has changed surprisingly little in 150 years.
Early clippers were often made of cast iron or steel. They were heavy, prone to rust, and expensive. The hole served a practical purpose: hanging the clipper on a nail in the workshop or bathroom.
As manufacturing techniques improved, clippers became smaller, lighter, and more affordable. The hole persisted—not because it was essential for hanging, but because it served the secondary purpose of blade alignment.
Today, most clippers still have the hole, even though many people never use it. It’s a design feature that has outlived its original necessity but remains useful for those who know about it.
Frequently Asked Questions
Can I use the hole to sharpen my nail clipper?
No. Use fine-grit sandpaper or aluminum foil instead.
Why doesn’t my nail clipper have a hole?
Some cheaper or smaller clippers (travel sizes, some drugstore brands) omit the hole to save manufacturing costs. Look for mid-range or professional brands.
Is the hole the same on all nail clippers?
Not exactly. The size and placement vary by brand and model. But the function is generally the same.
Can I use the hole to attach a lanyard?
Yes. Thread a small split ring or key ring through the hole. Attach a lanyard for travel or storage.
I dropped my clipper and the blades are misaligned. Will the hole help?
Yes. Use another clipper (or small screwdriver) to gently bend the blades back into alignment. See instructions above.
Should I oil my nail clipper?
A tiny drop of mineral oil or sewing machine oil on the pivot pin can keep the action smooth. Don’t over-oil—it will attract debris.
A New Appreciation for a Tiny Hole
Here’s what I love about learning what that little hole is for.
It’s a reminder that everyday objects are often more thoughtfully designed than we realize. That tiny detail you’ve ignored for years? It’s not random. It’s not decoration. It has a purpose.
A purpose you now know.
So the next time you pick up your nail clipper, take a moment. Look at that little hole. Appreciate the ingenuity. And if the blades ever go wonky, you’ll know exactly what to do.
Now go clip your nails. And hang the clipper up when you’re done. 🧼✂️